RentViewer Activation from Rent Manager
Follow these four steps to authorize RentViewer access to your Rent Manager data. The process takes less than 10 minutes and requires Admin privileges.
Requirement: You must have the Manage Users privilege in Rent Manager to complete this activation. If you cannot access Admin settings, ask your Rent Manager system administrator.
Locate the RentViewer Integration
- 1Log into Rent Manager as an Admin user.
- 2Navigate to Admin → Setup → Users.
- 3Select your Admin user account.
- 4Go to Admin → Available Integrations.
- 5In the search box, type "RentViewer" to find the integration.
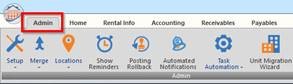
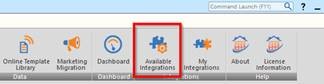
You must have Manage Users privileges to complete this activation. If you do not see the Available Integrations menu, contact your Rent Manager system administrator.
Activate RentViewer
- 1Click "Request Activation / Activate" next to the RentViewer integration.
- 2Enter your name, email address, and phone number in the form.
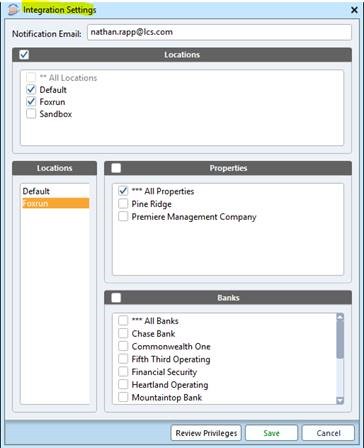
- 3Select all Properties & Bank settings you want RentViewer to access.
- 4Select the Locations where you want the integration enabled.
- 5Submit the activation request.
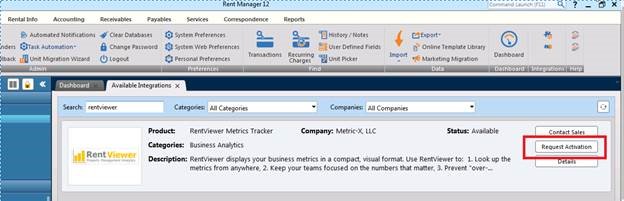
Select all properties and locations that you want RentViewer to pull data from. You can update these settings later from the My Integrations menu.
Configure Permissions
- 1Go to Admin → My Integrations to review the settings you just created.
- 2Confirm that the correct properties are selected for each enabled location.
- 3Adjust location-enabled integration settings as needed.
- 4Ensure all required properties are checked for reporting purposes.
- 5Click "Request Activation / Activate" again to confirm your selections.
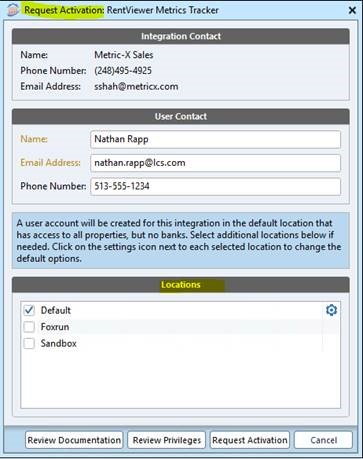
Double-check that every property you want to report on is included. Missing a location at this stage means RentViewer will not pull data for those properties.
Notify RentViewer
- 1Send an email to support@rentviewer.com confirming that the above steps are complete.
- 2Include your company name and the Rent Manager instance name in the email.
- 3Our team will verify the connection and confirm when data is flowing.
- 4You will receive a reply within one business day.
This notification step is required. RentViewer will not begin pulling your data until you confirm the activation is complete on your end.
What happens after you activate
We confirm the connection
We check that your Rent Manager data is flowing and reply within one business day.
You set your targets
One working session with your leadership team. Pick the eight to ten goals that matter most, set targets from your budget, and name one owner for each. We do the heavy lifting. Your part is written goals, named owners and that one session.
Your team runs its first weekly review
Each person sees their own targets and gaps. Customer Success joins weekly calls until the rhythm holds.
The full Business Operating System follows in weeks, not months.
Need help with activation?
If you run into any issues during the activation process, our team is ready to help. Reach us by email or phone — we typically respond within one business day.